Manufacture Process
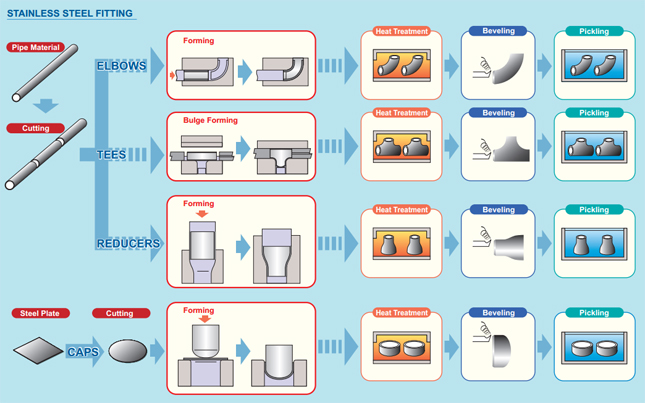
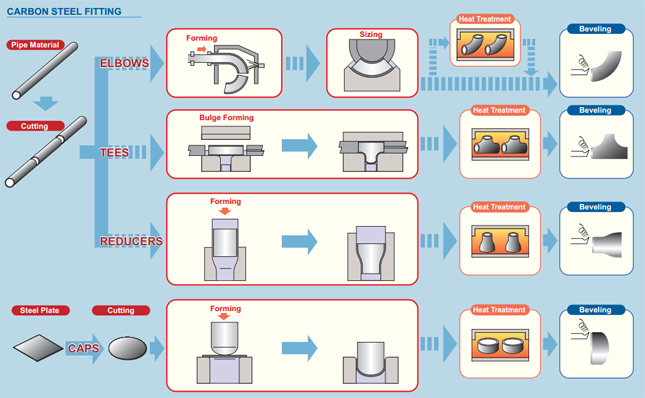
Buttweld Fittings manufacturing Process


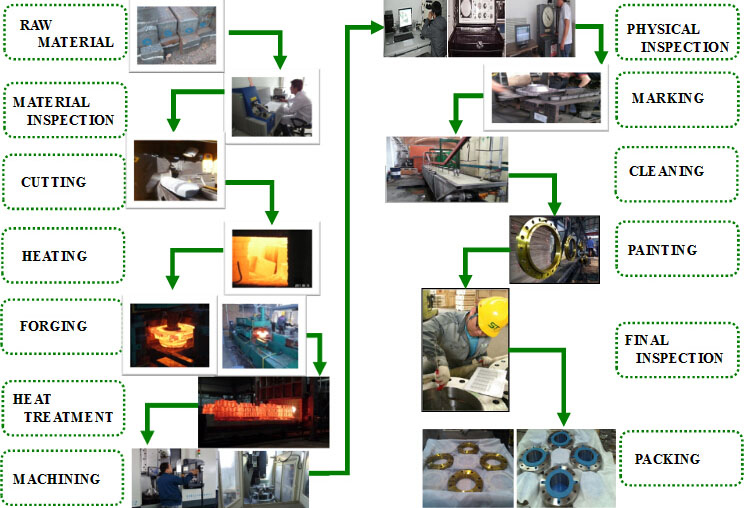
Flanges Manufacturing Process

Manufacturing Procedure for Butt‐Weld Pipe Fittings:
Material Selection: The process starts with the selection of appropriate materials based on the
specifications required for the final product. Common materials for BW pipe fittings include carbon
steel, stainless steel, alloy steel, and various other metals.
Cutting and Shaping: Raw materials, typically pipes or steel plates, are cut into appropriate sizes and
shapes using cutting machines such as saws or plasma cutters. Forging or casting may also be
employed to form the basic shapes required for the fittings.
Forging / Forming: The shaping process involves forming the raw materials into the desired shapes
for the fittings. This can be done through various methods such as hot forming, cold forming, or
machining, depending on the material and the complexity of the fitting.
Heat Treatment (if necessary): Depending on the material used and the desired properties of the
final product, heat treatment processes such as annealing, normalizing, or quenching and tempering
may be employed to achieve the required mechanical properties and microstructure.
Machining: Machining processes such as turning, milling, drilling, and threading are performed to
achieve the final dimensions and specifications of the fittings. This step ensures that the fittings
meet the required tolerances and surface finish.
Welding: Butt welding is the primary method used to join pipe fittings. In this process, the ends of
the pipes or fittings are beveled to create a V‐shaped groove, and then they are joined together by
welding along the seam. This creates a strong and leak‐proof joint.
Quality Control: Throughout the manufacturing process, various quality control measures are
implemented to ensure that the fittings meet the required standards and specifications. This
includes dimensional inspection, visual inspection, non‐destructive testing (such as ultrasonic testing
or radiographic testing), and pressure testing.
Surface Treatment (if necessary): Depending on the requirements, surface treatment processes
such as pickling, passivation, or coating may be applied to protect the fittings from corrosion or to
improve their appearance.
Final Inspection and Packaging: Once the fittings have been manufactured and tested, they undergo
a final inspection to ensure that they meet all the specified requirements. After inspection, the
fittings are properly packaged and prepared for shipment to the customer.
Manufacturing Procedure for Forged Pipe Fittings:
Material Selection: Choose the appropriate materials based on the specifications required for the
final product. Common materials for forged pipe fittings include carbon steel, stainless steel, alloy
steel, and other metals.
Heating: Heat the selected raw material to a suitable forging temperature. This temperature varies
depending on the material and its properties. Heating can be done in furnaces or using induction
heating methods.
Forging: Shape the heated material into the desired fittings using forging equipment such as
hammers or presses. The forging process involves applying controlled pressure to the heated
material to deform it into the required shapes. This can be done through open die forging or closed
die forging methods.
Trimming: After forging, excess material or flash is removed from the forged fittings using trimming
or cutting processes. This step ensures that the fittings have the correct dimensions and surface
finish.
Heat Treatment: Depending on the material and the desired properties of the final product, heat
treatment processes such as annealing, normalizing, or quenching and tempering may be applied to
enhance the mechanical properties and microstructure of the fittings.
Machining (if necessary): Some forged fittings may require additional machining operations to
achieve the final dimensions and surface finish. This can include processes such as drilling, milling,
threading, or grinding.
Surface Treatment: Apply surface treatments such as pickling, passivation, or coating to protect the
fittings from corrosion or to improve their appearance.
Quality Control: Throughout the manufacturing process, various quality control measures are
implemented to ensure that the fittings meet the required standards and specifications. This
includes dimensional inspection, visual inspection, and non‐destructive testing (such as ultrasonic
testing or dye penetrant testing).
Final Inspection and Packaging: Conduct a final inspection to ensure that the fittings meet all
specified requirements. After inspection, the fittings are properly packaged and prepared for
shipment to the customer.
Manufacturing Procedure for Flanges:
Material Selection: Choose the appropriate materials based on the specifications required for the
final product. Common materials for flanges include carbon steel, stainless steel, alloy steel, and
other metals.
Cutting and Shaping: Cut the raw materials into the desired shapes and sizes using cutting machines
such as saws, plasma cutters, or water jets. The raw materials may be in the form of plates or
forgings.
Forging / Forming: Shape the cut materials into the specific flange configurations using forging,
rolling, or machining processes. Forged flanges are produced by applying controlled pressure to
deform the heated material into the required shapes. Rolled flanges are formed by passing the
heated material between rollers to gradually shape it. Machined flanges are produced by removing
material from a solid block or forging to achieve the desired dimensions and contours.
Drilling and Tapping: Drill holes and tap threads into the flange faces to accommodate bolts for
connecting to piping or equipment. This step ensures that the flange can be securely attached to
other components in the piping system.
Heat Treatment (if necessary): Depending on the material and the desired properties of the final
product, heat treatment processes such as annealing, normalizing, or quenching and tempering may
be applied to enhance the mechanical properties and microstructure of the flanges.
Surface Treatment: Apply surface treatments such as pickling, passivation, or coating to protect the
flanges from corrosion or to improve their appearance.
Quality Control: Throughout the manufacturing process, various quality control measures are
implemented to ensure that the flanges meet the required standards and specifications. This
includes dimensional inspection, visual inspection, and non‐destructive testing (such as ultrasonic
testing or dye penetrant testing).
Final Inspection and Packaging: Conduct a final inspection to ensure that the flanges meet all
specified requirements. After inspection, the flanges are properly packaged and prepared for
shipment to the customer.